
PVC Pipe, Sump Pump, Elbows, Glue, Flexible Connector, Hangers, Backflow Preventer Check Valve….
If you’ve never done this before, this post will provide a list of tools, tips, and considerations on how to install a submersible sump pump and pipe the water out of your home. Do it yourself & save money (but not time).
I bought a new sump pump recently and had never installed one before. I wanted to hard pipe the installation, but had never glued PVC pipe together. I looked on Google to see how long I would have to wait after gluing before I could turn the pump back on, but found precious little info regarding the subject. So I figured this would make a welcome post for a few of you DIYers out there.
Sump Pump: Submersible vs. Pedestal
On my local Public Radio station, I heard a trusted home improvement expert say that pedestal pumps aren’t as preferable as submersible pumps. I didn’t even know what a submersible pump was. He also suggested at least a 3/4 horsepower model for most homes, although after doing some research, I don’t see why a quality 1/2 HP submersible model won’t work for most. When my pedestal sump pump went on the fritz soon after, I went to the hardware store to pick up a new pump.


What’s the difference between these pumps?
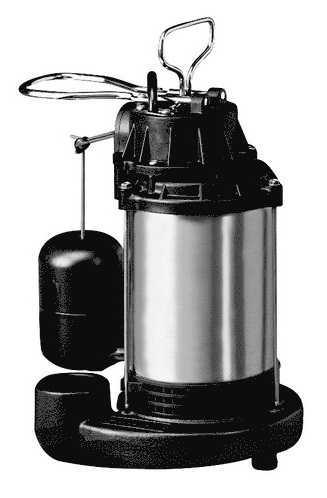
Pedestals are less expensive than submersibles. They’re louder because the motor sticks up above most sump holes, making it difficult to put a lid on the sump hole.
Pedestals typically wear out sooner because the motor is air cooled, whereas the submersible has cool groundwater surrounding it to dissipate heat through.
Do you see the long float switch on the pedestal pump with the little guide-arm in the middle? Yeah, that gets bent easily, and then the float gets stuck either up or down, both of which renders the pump useless.
Some people only care about lowest price, which is silly. For the rest of us, the price details as I’ve found them are as follows:
A good submersible, 1/2 to 3/4 HP, 4600 Gallons Per Hour, Lifetime Guarantee (yes, lifetime) should run between $160 and $200 on sale.
A pedestal should be somewhere between $75 and $120. In other words, submersibles are twice as much as pedestals, but worth it in my opinion.
Got the Pump. What Else?
Click here for a printable PDF Shopping Checklist to take to the hardware store.


The Usual Stuff:
Sharpie Marker, Hammer, Tape Measure, Reciprocating Saw (or hand saw).


If you don’t have a reciprocating saw, get a hacksaw, or something like this Ridgid PVC / Plastic saw costs about $20.
PVC Pipe & Connectors:
I hope you didn’t get all the way to the home store without looking at your project, evaluating the twists and turns your piping is going to take, and writing down a reasonable tally of PVC sections, elbows, and connectors to purchase.
Get your tape measure out and think about where you want to run your pipe, and then count every time you have to make a corner or join 2 pieces of straight pipe (PVC pipes come in 10 feet or 5 feet sections). Its easy to think of 90° elbows… but do you have sections where you’ll need 45° or 60° elbows? Try to figure it out now so you don’t have to run back to the store. If you get too many pieces, you can always bring them back for a refund.

Get 1.5″ diameter Schedule 40 PVC Pipe.


An adapter like this will screw into your sump-pump, and then you can glue PVC pipe into the other end. Wrap the threads with Teflon tape if you have any.


PVC Glue:
This comes in 2 separate containers. You paint the primer on both mating surfaces and let it dry, which it does very quickly. It’s also usually dyed so you can see where you’ve applied it. Keep this away from any clothes or furnishings that you don’t want ruined.
Next you paint the “cement” on both mating surfaces (which should be stained with dye already) and push the pieces together, twist, and hold them tight for a few seconds. A chemical reaction is going on here. The two pieces of pipe are becoming one. They also may try to push each other apart for some reason, which is why you should apply pressure to push them together until they’ve bonded, which won’t take more than 10 seconds.

Check Valve:
Maybe you’ve heard it referred to as a “Backflow Preventer”. Whatever you want to call it, it helps make sure that water doesn’t get pumped up through your pipes, but then doesn’t make it all the way out of your house and so runs back down through the pump to refill your sump hole. With a check valve, water goes out, but it cannot come back. It’s a one way street.

Notice the arrow on the side of the valve; it indicates which way the water is supposed to go, and after it passes this valve it can’t go backwards. I placed my check valve right after the pump. First the threaded piece, then a short piece of pipe, then the check valve.
Flexible Connector:
This piece is a must for a couple of different reasons. First, it allows you to undo the connection so you can remove or replace your pump in the future. Second, it’s a noise dampener.
Take it from me, when I first hard piped my pump it was extremely loud. In fact, it was a quieter operation standing right next to the sump hole than when I was on my main floor. This has something to do with all that pipe creating an acoustic amplifier, not to mention the piping ran up underneath a stair case, alongside a main HVAC duct, across some floor joists, and out the band joist of my house. There’s a lot of opportunities to create an auditory cacophony in that run. I sawed a pipe apart and reconnected it with a flexible connector, and the noise all but disappeared.

PVC Pipe Hangers:
I like the plastic hangers, but you can get the metal ones also. These are to nail to floor joists and 2×4 studs. If for some reason you don’t have this sort of structure to nail to, you’ll have to figure something else out to support pipe runs.
Support can be as simple as a nail with wire hanging off it, tied around the PVC pipe. This may not be up to code, but it’s what I found in my current house, and it worked for at least 20 years before I redid it.

So Now That I Bought Everything, How Do I Install?
Work back from the wall to the sump hole. I’ve written this post under the assumption that you’re replacing your pump with a new one, and there’s a certain amount of hard piping in place that allows water to leave your house, whether through a hole in the band joist or basement wall. My advice is to work back from this to your sump hole, wherever you feel it’s a good spot to cut in and start gluing on new pipe. This is because your sump hole probably provides more wiggle room to make your pipe run than a right-sized hole in brick or joist material.
It’s not brain surgery. Just get your tape-measure, measure twice, cut once. If you actually need your pump to turn on often and regularly to keep water out of your foundation, then make sure you’ve got your project laid out well enough that you can glue and reconnect everything in time to turn the pump back on before groundwater floods onto your basement floor. I turned my pump on immediately after gluing the last pipes together, and it didn’t cause any leaks or failure.
And if your water issues are critically pressing even for only the Spring rainy season each year, I would strongly suggest having more than 1 sump pump.
Video of My Hard Piped Submersible Sump Pump:
How To – Plumbing – PVC Pipe – Submersible Sump Pump – Installation
In Conclusion:
I’m sure if a professional Plumber looks at this, it won’t be exactly the way they would do it. That said, the project doesn’t leak, it’s quiet, it’s worked well so far, and I didn’t have to pay a professional to do it. If you’re a Do It Yourself-er, you can do this even if you’ve never glued PVC tubing together before (like me).