
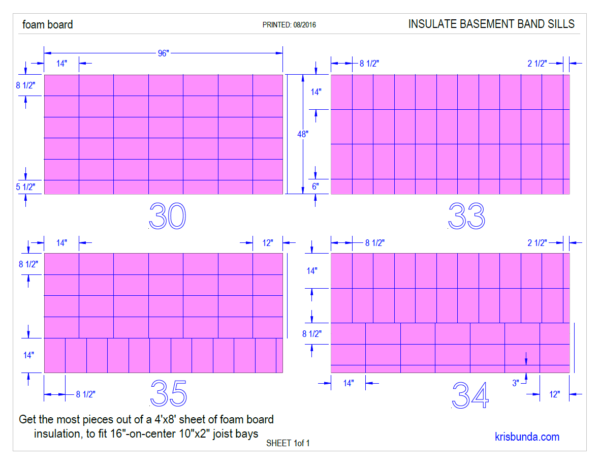
DIAGRAM – EFFICIENT CUT OF 4×8 FOAM BOARD SHEET, FOR BAND SILL INSULATION
Not Every Blank is a Short Rectangle!
This will be obvious as you do this project, but not every blank is a short rectangle that fits between 16″-on-centers joists. On the ends of your foundation you’ll have the spans where the floor joists run parallel to the band joist, and you’ll have to cut LONG pieces. I staggered my plies, if it made any difference in ease of install or insulation value, I don’t know. But the point is, some of these sheets you’ll want to cut long strips.
Tip: To Mark Boards for Cutting: Use a Chalk Line , Laser Line, or Marker & Straight Edge
 ,
,  , or
, or  &
& 
CHALK LINE:
- I put my board on top of a little platform (sawhorses) and when along each edge and made pen marks according to the print above.
- Then I’d make a little cut with the utility knife at each mark, to hold the chalk line end.
- Take a chalk line, set it into the cut, pull it across to its corresponding cut or mark, and snap a line.
- NOTE: I could not get chalk to stick to this foam worth a damn, but if I snapped it good and then cut right away, it worked alright.
LASER LINE:
- You kinda have to make sure your board is clamped down, OR if you have a laser that has those sharp needles on the bottom and can stick it to the board without getting in the way of cutting, try that.
MARKER AND STRAIGHT EDGE:
- I started doing this more toward the end. I had a 6ft level and a 3ft level, and would just mark off my lines with a pen, then connect them with a level-as-a-straight-edge, and draw my line.
- Certain pens mark on this foam well, you’ll have to find what works for you.
The tool I used for cutting was a reciprocating saw with a metal or PVC blade on it.
 with a
  on it.
At first I tried a PVC hand saw , and that was a joke.
INSTRUCTIONS: Dry Fitting Workflow
It’s smart to dry fit at least a half-dozen bays at a time. Even after you’ve measured several joist bays and determined they’re all about the same width, & therefore you cut a bunch of blanks out of the 4×8 sheet, you’ll still have to do more trimming and cutting to make them fit around protrusions.
- Cut up a board and get your 30 to 35 pieces.
- Walk down a row of joist bays, and drop 2 pieces on the floor under each bay. (Let’s call these “BLANKS” from now on, so we’re not confused)
- Get your step ladder, equipped with:
- A pen that marks legibly and easily on your foam board
- A tape measure
- A utility knife and/or drywall hand saw
- A reciprocating saw
- NOTE: I scooted a little trash can along everywhere my step ladder went, and rested my recip saw on it. Cutting a hole for a pipe is quick with that saw, but makes a lot of crumbs, so I did it over the trash can. Still makes a mess, but at least you can toss your scraps in as you go.
- Move down the line, dry fitting the blanks in the bays.
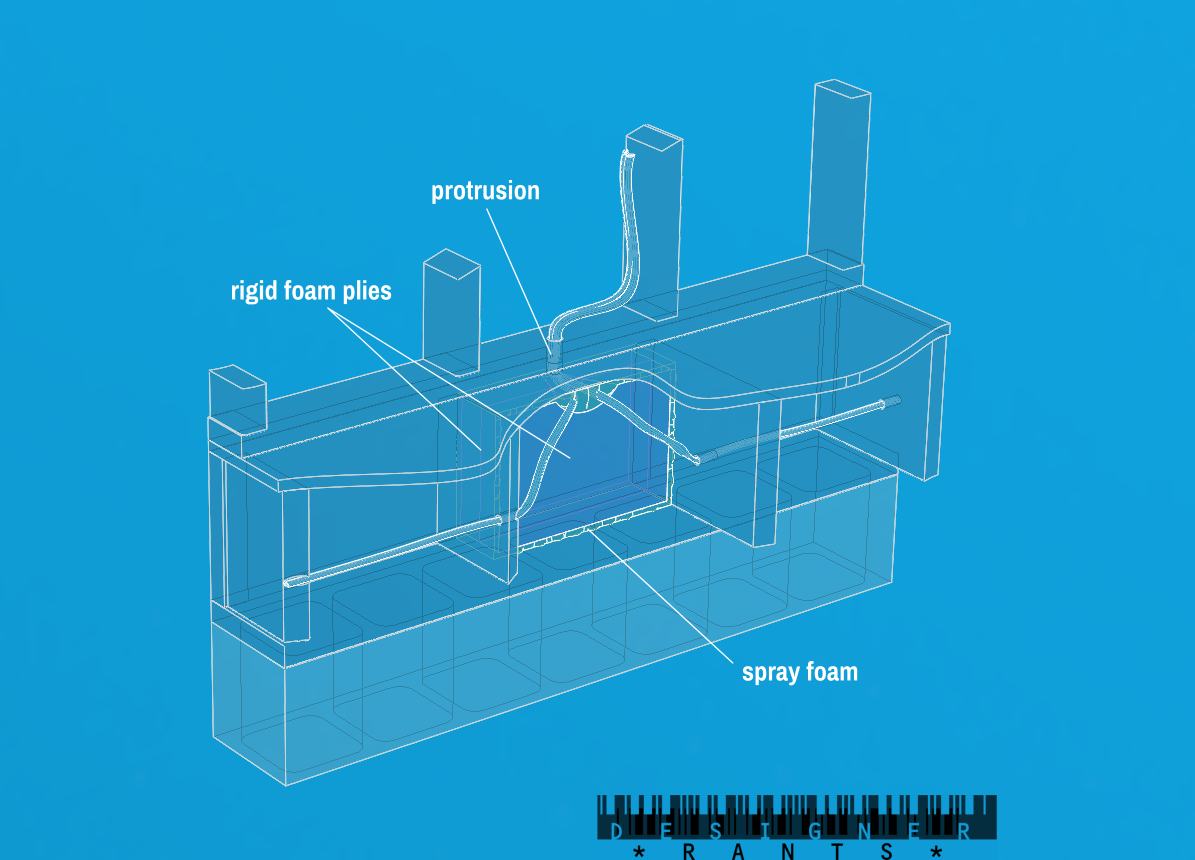
- If you have a bay with a protrusion, that protrusion will often require a different trimming for the 1st ply that goes in than the 2nd ply (See YouTube animation video or graphic below).
- Measure to the protrusions in the bay and mark them up on the blank with your pen.
- Cut them to fit, with enough room to get in later and squirt spray foam (about 1/2″ all around).
- If one blank’s cutouts are different than the other blank in the same bay (happens unless a protrusion is totally perpendicular to the band, like a sill cock), then:
- Write yourself a note on the blanks, like “1st”, when you put them back on the floor below their joist bay.
- Or, put the first one in the bay and the 2nd one on the floor for later, when you’re moving through spray foaming.
- Sometimes you need to get even more creative with cuts than the graphic below shows, like cutting a blank into 3 pieces to get them to fit around a pipe.
- Once you’ve got a line of at least 8-to-10 bays that have been dry fit (, you can confidently move through it again with your spray foam gun, and fill in the cracks.
- NOTE: Why get at least eight bays’ blanks lined up before getting your foam gun ready?
- Because that’s about how long a large can of foam lasts.
- AND Because you don’t want to stop constantly when you’re foaming. Even with the gun version, you may have to push 3/8″ tubing over the tip to get into certain areas, and you don’t want it sitting there curing while you take ten minutes to get a couple blanks fit up.
- Wear gloves, long sleeves, pants, shoes, and hair covering–all of which should be “trashable” garments. Also wear: a head lamp
- (I’m not being a safety nanny here–trust me–I’ve cleaned enough of this stuff from my arm hair and fingertips to cover up.)
- Get your spray foam gun and a can of “Pro” spray foam (it screws into the gun)
- Be ready to push some 3/8″ ID plastic tubing over the nozzle of the spray foam gun tip, depending on how much structure is in your way. There were at least a third of my bays where I wouldn’t have been able to foam them without cutting an appropriate length of tubing to squirt the gun through.
- TIP: Start on the part of your basement with the least protrusions and the easiest access, then get make it harder on yourself as you get the hang of it.
- NOTE: Why get at least eight bays’ blanks lined up before getting your foam gun ready?
 , equipped with:


Animation I made to illustrate how each dry-fitted piece may be different, so cut ahead of time and either mark them, or put one in the bay and one on the floor, or put them in order on the floor… whatever helps you.
Feels Like Much More Could be Said About Technique…
I don’t want to spend another thousand words here on little tricks I learned. By the time you get done with your band sill, you’ll be an expert… right when you don’t need to be anymore. And of course, it ain’t rocket science.
Tip: consider tracing and labeling your covered-up wiring on the face of the pink foam board.
One other tip I found out in retrospect: Consider using a good sharpie marker to label and trace out any Romex home wiring
 you may be covering up. When the radon mitigation
 specialist visited, he needed to cut a hole in the joist
 , and I couldn’t remember if wires ran down the middle of the joist or along the top (on one of the ends of the foundation where there’s long runs instead of 16″ bays). Having a black marker trace of the approx routing would’ve told me if we can just cut through it with a hole saw or have to yank a section of the insulation back to be sure.
Now this is a moot point if you come by later and spray a couple coats of fresh paint all over your basement, as was our fate. Not sure what to do then other than just deal with not knowing exactly where your wires are.


Leave a Reply