1.) In your router: bind your phone’s MAC address to a static IP address.
2.) Change your phone’s IP address to said static IP address.
If that sounds like nonsense, read on, I’ll explain.
Here’s how I fixed it: When my Android phone suddenly stopped connecting to the Internet, while other devices connected without issue.
Here’s what I first noticed about this problem:
- The phone would connect to the WiFi (router), but not the Internet.
- Meanwhile, all computers (PCs) and other devices connected to the internet, except our Android phones!
- That’s how I knew the cable modem worked, because other devices could access Internet.
- And obviously the router worked, because nothing had difficulty connecting to it, not even the phones that wouldn’t connect to the Internet.
- So… the problem must be with the phones.
Here’s what I tried first to fix the problem:
- Power cycled cable modem & router (multiple times)
- Power cycled phone (several times)
- Tried connecting/disconnecting to various SSIDs (wifi network names)
These steps changed nothing.
This may be purely coincidental, but the day before, lightning struck a utility pole in our neighborhood and we lost power for an hour.
Our phones could’ve been on cellular-data-only for a day before we noticed and then tried to switch back to our home wifi, only to find the networking problem–and that’s how the issue could’ve gone unnoticed for 24hrs. I include this vignette only because you may be here after some squirrelly home networking probs that cropped up after a power outage.
The Final Symptom, or the characteristic of this problem that “cracked the case” for me, was noticing that the phone was trying to squat on another device’s IP address
I finally noticed my phone was attempting to assign itself the one address I remembered reserving for our Roku Stick. Because it used to have so much trouble hunting for a spot on the router, I finally “bound” its MAC address to an IP address so it always can quickly home in on that, and it made it easier to control via the Roku Remote app on our phones.
So that was the giveaway.
Change to Static IP Addresses instead of DHCP
I decided I’d assign every device its own IP address–I have literally hundreds available in my router, so why not? And in my router, it’s easy a pushing 1 button to bind all devices on the network to their own dedicated address (see “Bind all” button in a screenshot graphic below). Then hopefully I don’t have this problem again anytime soon, of 2 devices fighting over the same slot.
There’re 2 parts to this solution:
- You’ll have to change settings on your local router,
- And you’ll have to change settings on your phone.
- (I had to anyway, because my phone was determined to use an address that was already reserved for our Roku Stick, 192.168.1.106. I had to manually force my phone to use .107 instead.)
Part 1: Router Settings
Binding device’s MAC addresses to an IP address
- Login to your Router Admin panel
You probably have a different router than me, and therefore; different menus. That’s okay. You’ll figure it out.
1.a) Go to your router’s Admin login screen. Usually if you’re on a computer or device that is on your home network (we’re still operating under the assumption you’re just having issues with your Android device connecting to the net, not other devices), you can get to your router’s admin screen by typing this IP address into your browser’s address bar:
192.168.0.1
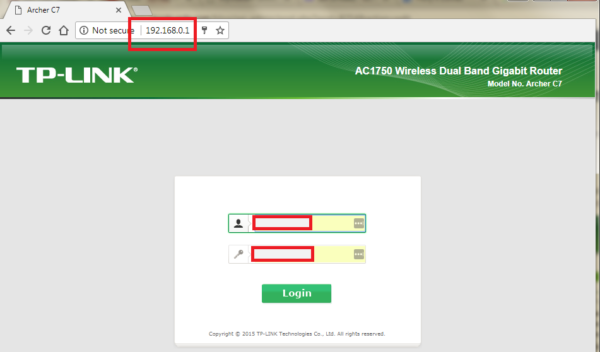
1.b) Then login to your router. If you’ve never done this before (if someone else set up your router), there’s probably the login and password on a label on the back of your router. (Your router is the little box with blinking lights that’s not your cable modem, or it’s the only box with blinking lights you have if it’s an all-in-one modem/router).
2.) Go to Binding Settings
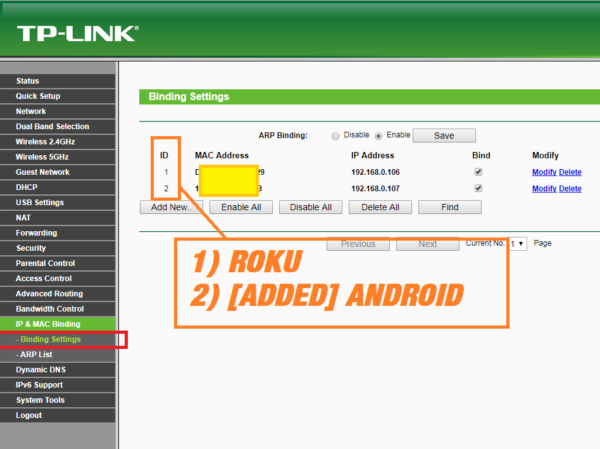
You can see in this screencap, the section for binding is actually labeled something straightforward, like “IP & MAC Binding”. Hopefully yours is similarly labeled. Or look for “ARP“ (Address Resolution Protocol).
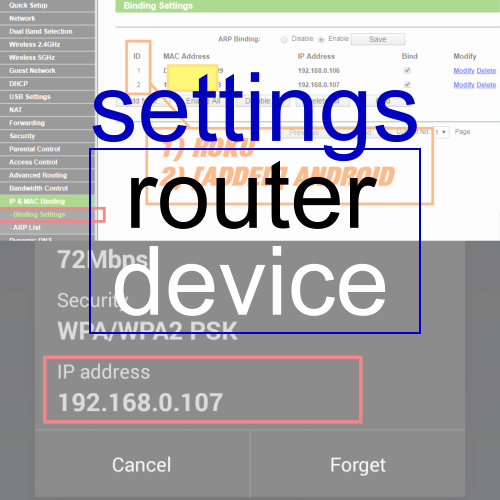
You can see I had assigned a device’s MAC address to an IP Address ending in 106. (ID #1 in the ARP Binding Table shown below). That is my Roku Stick. And since my phone suddenly kept trying to also access the Internet via that address, and I couldn’t get it to just find a new one, I bound my phone’s MAC address to an IP address ending in 107 (ID #2 in the screenshot’s table).
2.a) Now, where to find the phone’s MAC address?
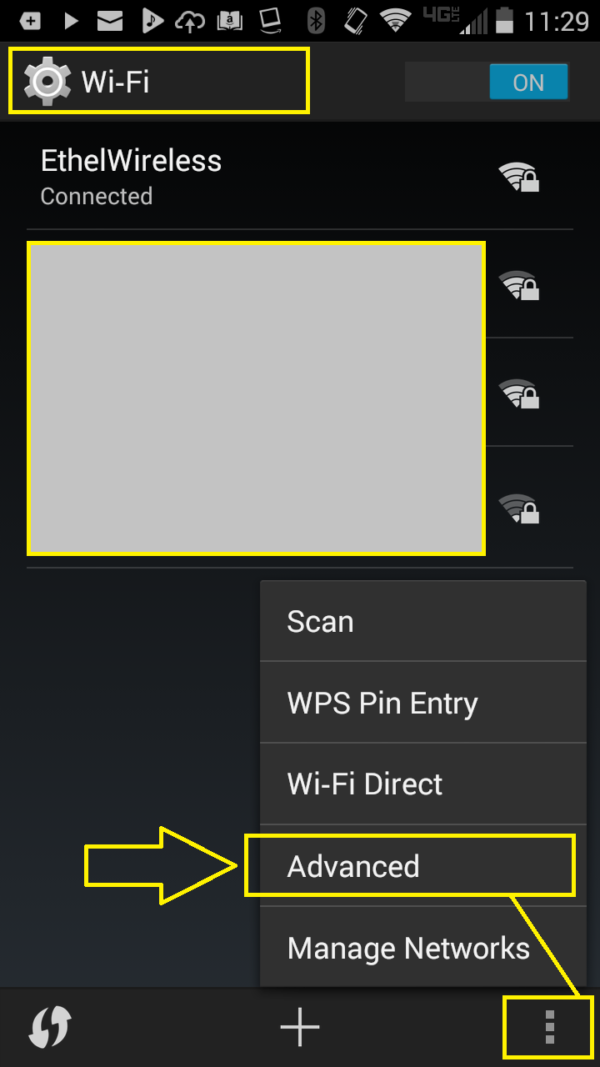
- Go to your Android device’s Wi-Fi settings > push the 3-dot menu > choose “Advanced”.
Screenshot FIND ANDROID PHONE MAC ADDRESS 1
- Scroll down until you see “MAC Address“.
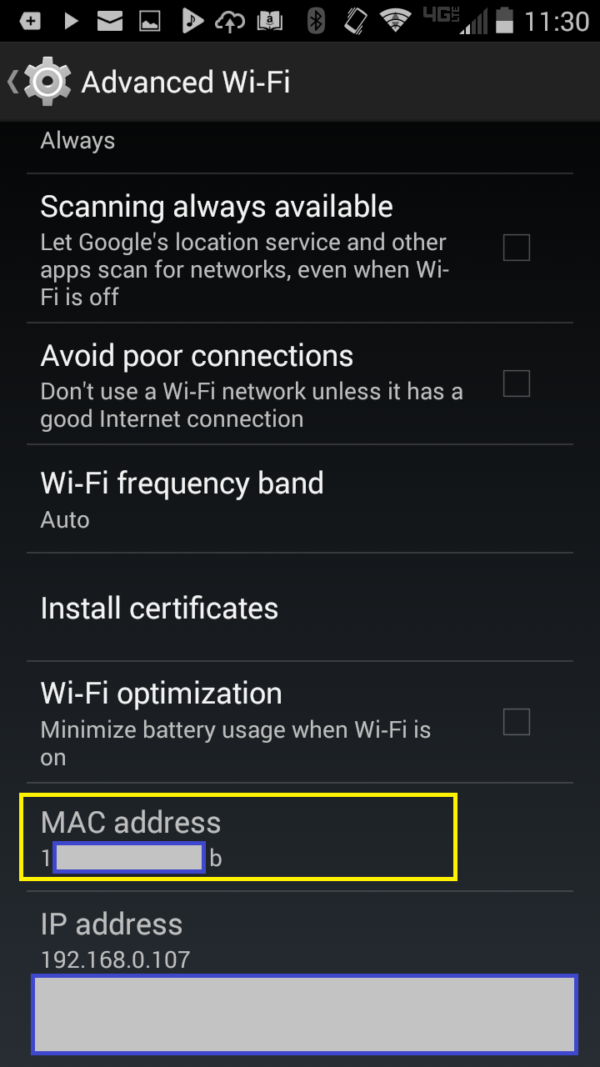 Screenshot FIND ANDROID PHONE MAC ADDRESS 2
- Type this into your router’s “MAC Address” field (In the dialog that appears when you “Add new” device to Bind).
- Then type an IP address for your Android device.
- i.e.; if most of your other devices have taken up 192.168.0.101 through 192.168.0.115, maybe jump ahead a few slots and assign 192.168.0.120 to your device’s MAC address.
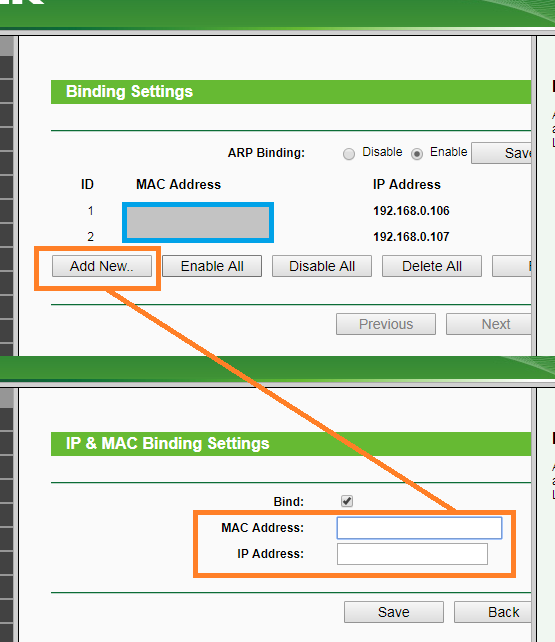
While I was at it, I went into the ARP List submenu, looked at all the devices currently accessing my home network, and just clicked the “Bind All” button. Now all devices will have a dedicated address on the home network, and there should be fewer of these conflicts that confuse the devices and cause Internet connectivity problems.
THEN, this had the added bonus of not having to assign addresses to the devices–the router did it, and I just went into my phone, saw what the MAC address was, found it on this list, then changed the phone’s static IP address to the address it is bound to on this list.
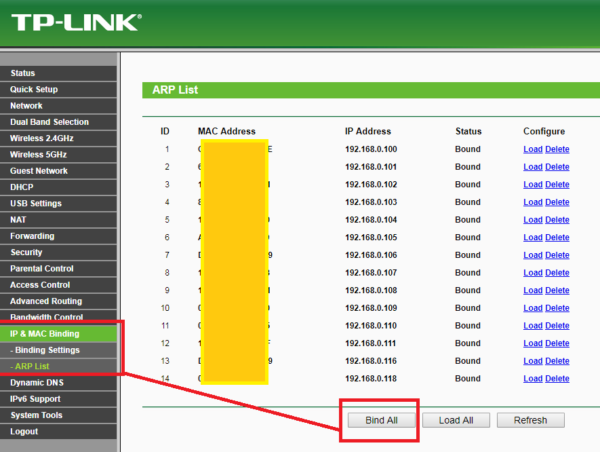
NOTE: If you Bind All devices, you shouldn’t have to then go into all the devices you own and change their settings to use a static address. They should all automatically negotiate their slot with the router:
- Router (as a Maître D’) says: “Oh hello Monsieur Roku Stick, I see your MAC Address is reserved, your table number 192.168.0.112 is ready, right this way…” (Mr. Roku Stick proceeds in orderly fashion to his assigned location.)
Unfortunately, our 2 Android phones had gone to the Maître D’ and belligerently insisted they were also supposed to be seated at tables that were already seated and could not accommodate any more guests.Our phones were able to arrive at the restaurant (connect to the home network), but they were drunk and disorderly, demanding to sit at the wrong tables (IP Addresses), which is why they couldn’t connect to the internet (uh, I suppose; “Order off the menu” in my analogy).
THAT is why I included steps about forcing phones into Static IP mode and typing in a specific IP address–because they weren’t working with the router to find a proper slot on their own. I don’t know why not, and if I switched the phones back to Automatic or DHCP mode, they’d probably go back to working as expected.
Part 2: Android Device Wi-Fi Settings
Changing a device’s IP Settings from DHCP to Static
1.) Go to your device’s Wi-Fi settings, so the available networks are visible.
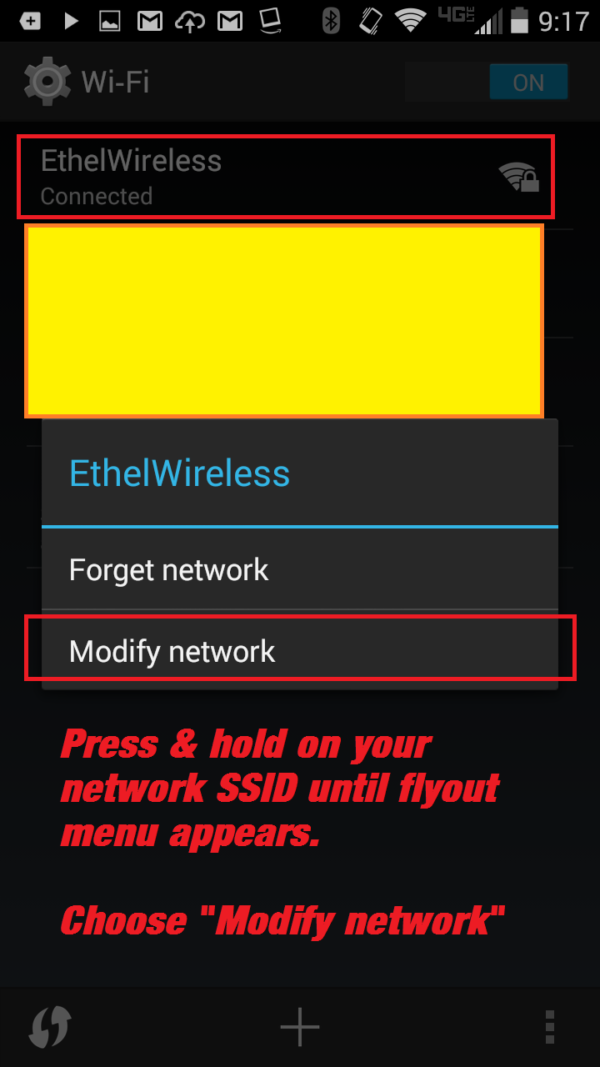
2.) Touch and hold on your preferred network’s name, until a flyout menu appears.
3.) Choose “Modify Network”.
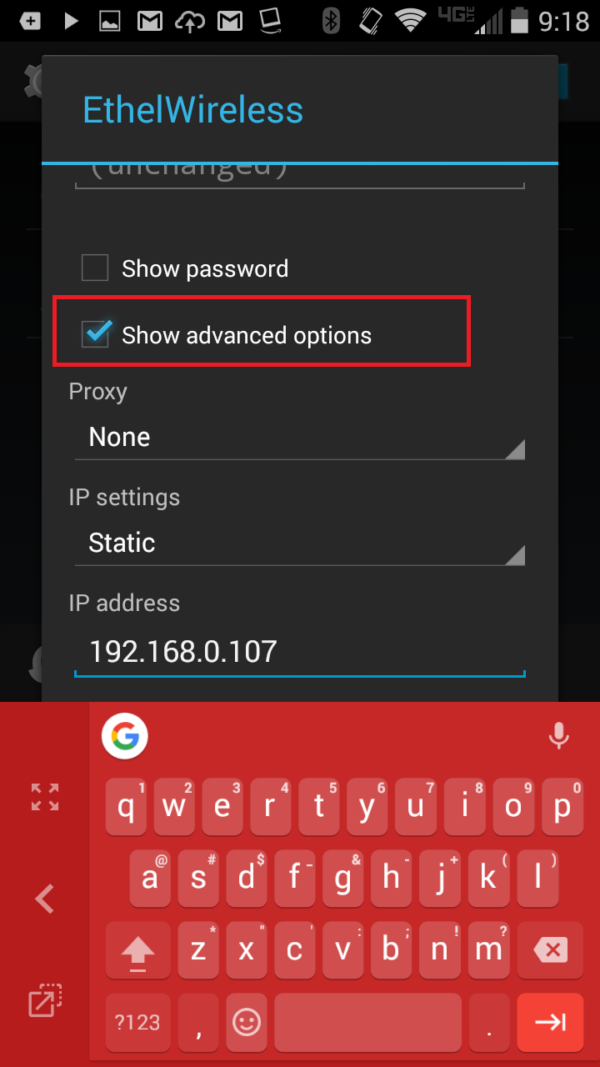
4.) Check “Show advanced options”
5.) Change your “IP settings” to “Static”
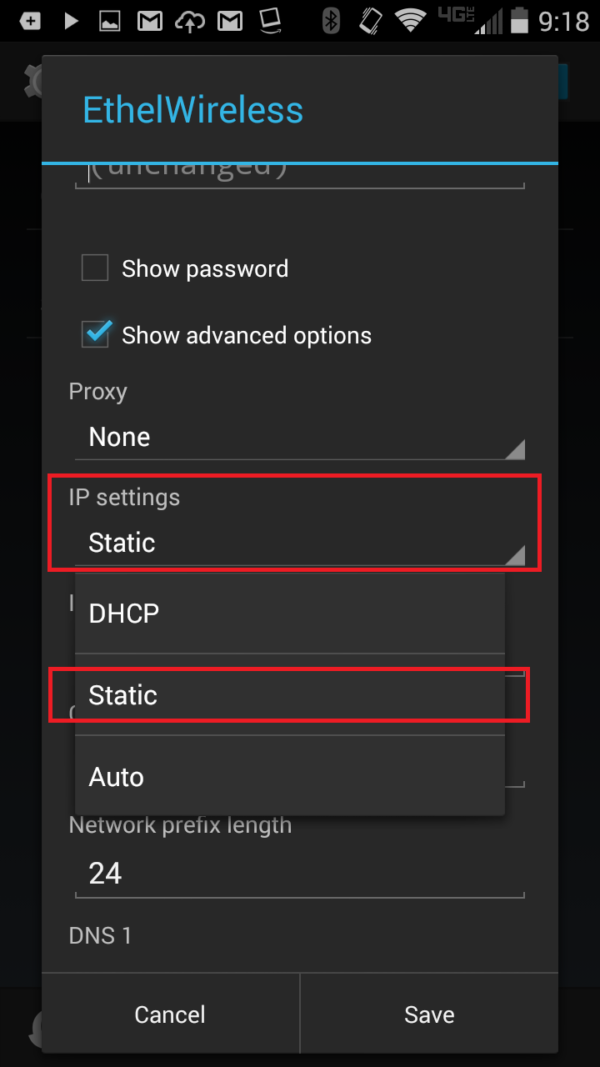
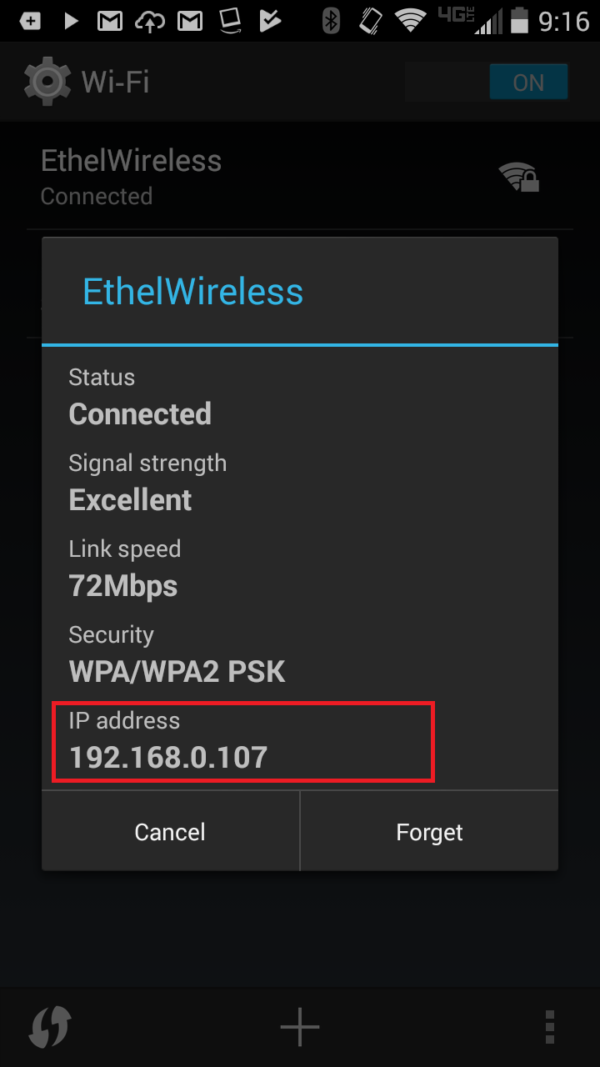
6.) Change your device’s IP address to the one you bound (binded?) to your device’s MAC Address in your router’s MAC Binding table (in Step 1).
- Touch the IP address, use the type pad to change the number(s).
- I changed my address to end in .107, the address bound to my phone’s MAC address to in my router.
Caveat:
I wrote this for people who don’t know the difference between a router and a modem, because they exist and I’ve been one of them. But if you’re one of those persons, and you actually went through this tutorial and changed some networking settings in your devices and router for the first time ever, give yourself a pat on the back.
Then realize that if something happens, like your router does a factory reset, you get a new one, or you update the firmware… you’ll probably lose your table of bound MAC/IP addresses. Then, if your phone is still rigidly intent on only using, say, .107 as its access to the internet, it may have issues. In this event, consider switching your phone back to “Automatic” or “DHCP”. Or set up your bound MAC/IP table again.
Conclusion:
Hopefully that unstuck your Android device from its sudden fruitless attempts to use an already-occupied IP address.




AOL Unused Error 418
Thank you very much for sharing this valuable blog after so many attempts I thought my phone is not working properly or I have bought a defected router but thank now It connects effortlessly