
MAKE SURE THE BIOS IS UPDATED TO THE LATEST VERSION. FIRST!
Legacy vs. UEFI wasn’t really the issue here, though. Instead of wasting hours fiddling with BIOS settings and recovery discs, I wish I had just done this in the first place: MAKE SURE THE BIOS IS UPDATED TO THE LATEST VERSION. FIRST!
I’m guessing Lenovo decided to make this workstation so bleeding edge, insofar as mass market corporate workstations go, that they pushed it out the door with some half-baked options. It happens. It’s not easy to make configurable products and not have any mistakes, nor test for all design flaws that create unknown malfunctions. At least it looks like Lenovo is trying to fix the issues.
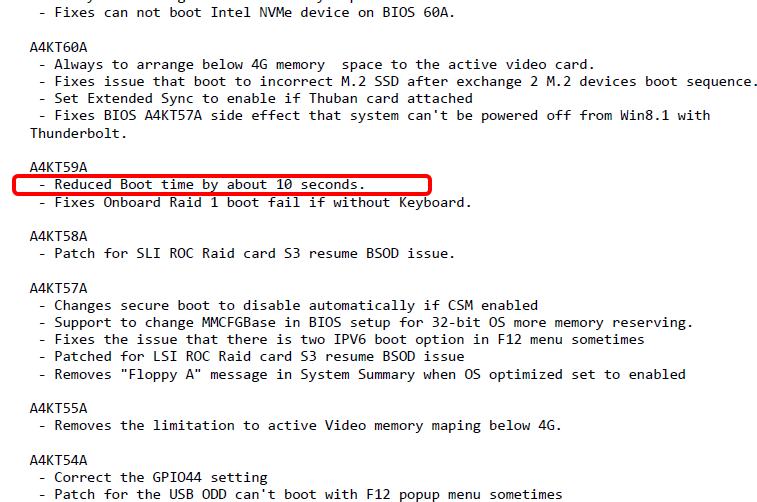
There may be other glitches that were impeding my progress, but here’s a rundown of the BIOS update fixes to date that caught my eye. (Click for PDF)
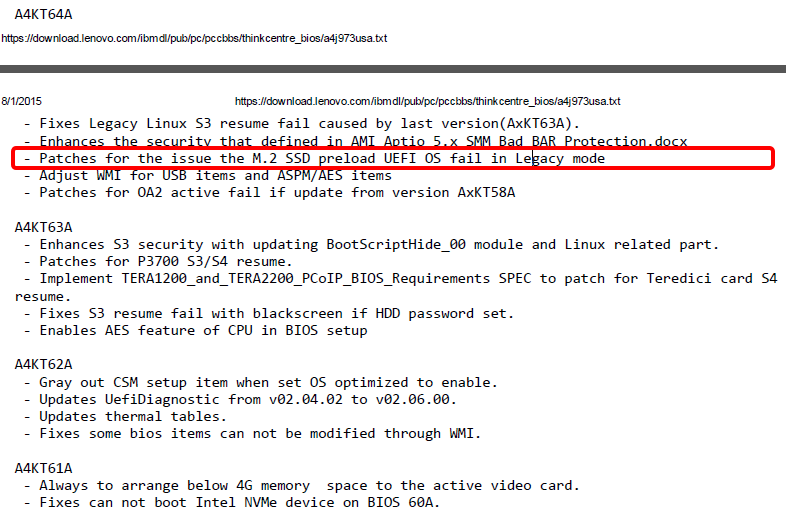
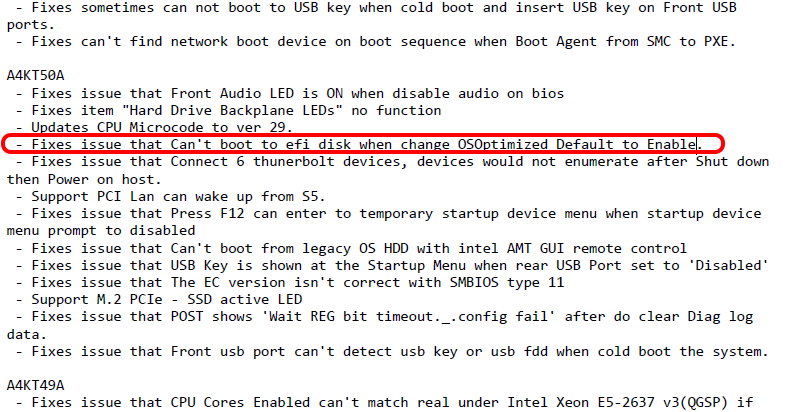
I’m sure that second one got me. I tried that “optimized” setting when the computer had its 1st OS install, because it was booting unimpressively slow and I wanted to get everything “optimal.” And then I set the Legacy/UEFI settings back to Legacy, because I knew Windows7 likes it that way. And then I saved the settings. It proved to be a punishing “optimization”, and changing the settings back to how they were didn’t help the computer find the boot drive again.
How To Update BIOS to Latest Version (For Novices)
- Go to Google, type in “lenovo p500 thinkstation bios update” (or p700, p900).
- Once you’re on this page, sort for “BIOS” and then sort for your Operating System.

- Download a format of update. I chose the CD/DVD version.
- I was in the situation where I couldn’t use the ThinkStation to make media as it wouldn’t boot to an OS. So I downloaded this CD/DVD vsn to my laptop, and burnt a disc.
- You can also choose the USB option for this situation, but I didn’t have a thumb drive lying around that I wanted to take the time to clear off. And when it comes to BIOS updates, you want the BIOS software to be THE ONLY FILE on the media. You don’t want some weird file confusion to brick your motherboard.
- Insert blank CD or DVD in your burner on your non-ThinkStation machine, if your ThinkStation machine is out of order at the time.
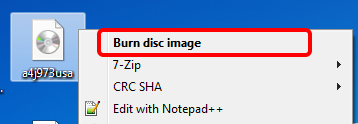
- If you have Windows 7, download this file to your desktop or wherever, right-click and choose “Burn Disc image” (other versions of Windows may have different commands for burning disc images).
- When the CD is ready, put it into the ThinkStation’s DVD drive.
- Restart your ThinkStation.
- If it’s messed up and keeps going through the boot sequence over and over, try CTRL-ALT-DELETE to restart, or just push the power button on the tower until it shuts off.
- When the computer restarts, push ENTER either once, or several times until a menu opens.
- Push ENTER (or whatever button pauses the countdown) if you need more than 10 seconds to make a choice.

- Push F12 to choose a different boot device.
")
- Choose the DVD drive.
- If there’s a UEFI version and a Legacy version, try Legacy.
- I’m not sure if this matters for BIOS updating, but it seems to for later when you install a Windows OS.
- The pic below doesn’t show 2 vsns of the DVD drive, I think it’s just whatever drive you’ve designated as the primary boot drive at the time that shows 2 versions.
- If there’s a UEFI version and a Legacy version, try Legacy.

- Your computer should now boot into the update DVD. Leave the machine alone unless prompted to make choices. You do not want to restart or mess up the machine when it’s rewriting motherboard firmware.
- I was asked 2 questions during my update, right at the start, which was remarkable as I’d never seen that before on a BIOS update.
- I was asked something about if I wanted to change the serial number and then if I wanted to change the machine model name. I typed “N” for “no” each time.
- Then it goes through a process of overwriting the firmware. This should take a minute or three. Let it go. The computer will probably restart itself when it’s done.
- After the computer restarts itself, it may not be done, so don’t just take the DVD out yet. It will tell you when. When I did it, I was surprised to see the update go through a whole other series of processes after it restarted. So, again, these are sensitive processes and should be left to their own devices.
- I was asked 2 questions during my update, right at the start, which was remarkable as I’d never seen that before on a BIOS update.
- When you’re sure it’s all done with the BIOS update, or it actually says it is, you can take the disc out.
Theoretically, after installing the BIOS updates, I probably could’ve then rebooted and witnessed the computer boot into its long-lost love, the boot drive that had the OS installed!
But I had burnt that bridge by trying several botched Recovery Media installs of OSs in the hopes of fixing the computer. So at this point, you can see if your computer works again, or if you need to install an OS.


Blaine C.
Kris – thanks for a great write-up! I was preparing to do the same exact build for a Revit workstation except with an E5-2367v3 & the K4200. I would like to use the M.2 card as both my boot & data drive – is that possible? My IT guy can’t seem to get me an answer. Also, how are you liking the 10gb to the server? Can that be done over CAT6?
Blaine C.
I also have the 1630 right now – it’s great.
Kris Bunda
Hi Blaine – Thank you!
The 10gb to the server REALLY made a difference. Large CAD files that had taken 30seconds to open may open in 7 or 10 seconds now. Or at least that’s my perception. I don’t want to set you up for too high expectations though, it’s not immediate. Also, I’m bitterly disappointed in how much of a bottleneck the internet service remains to be for when I try to open CAD files over VPN remotely. And yes, I believe our IT person said it had to be over CAT6, and he specifically had to patch that line into my workstation area (as opposed to the CATV ports on the wall outlet next to it).
The M.2 is really good. Even though I moved it from the Lenovo mezzanine card to another PCIe x4 slot (I don’t remember if I explained all that), it doesn’t seem to make a difference. I’m thinking both the FLEX slot and another PCIe 3.0 x4 lanes slot are theoretically the same thing.
You could definitely have your m.2 as both a boot and the drive you keep a lot of your files on – just like when you buy most computers, they often only have one hard drive. My only problem is that CAD files tend to get so large so fast that I’d rather just have them on a second (also fast) drive, like a different SSD. I’ve even gained more respect for mechanical drives, like the 2.5″ 10,000 RPM ones. I have one in my laptop to store some CAD files and photos on, and they load surprisingly fast. But I still require an SSD as the boot drive for the OS and programs to run from.
Hope my opinions answer your questions. If your IT person has some questions on setting up the M.2 with another drive (or if he’s having probs getting M.2 to work as boot drive for windows7), let me know, maybe I can help. There’s also a VERY helpful Lenovo staffer on the Lenovo forums with screen name “PSTurtle” (if memory serves). That person really helped me along in understanding much of the new “FLEX” module stuff Lenovo is selling that has such obscure and confusing documentation.
You’re reminding me that I should make a followup post on setting up the BIOS to use the m.2 card in a riser card in a different slot, while using the mezzanine “FLEX” slot for the HDD bays via LSI RAID card, and how to then set the m.2 card as boot and still have any other drives you push into the bays show up in the operating system. Because it wasn’t exactly intuitive. And it wasn’t automatic by any means.
Kris Bunda
Yes, that’s a real snappy processor, I’m really happy with it.
Frankly, I don’t understand why anyone would take more cores over speed, at least when it comes to most CAD tasks. Sure, on SolidWorks drawings, each view supposedly is assigned to a different core, making for “multi threading”. But aside from drawings, most modeling or simulation can pretty much only be single threaded linear solving (last I knew).
Perhaps it’s a completely different story for other CAD that isn’t solid model-focused.